Onboarding
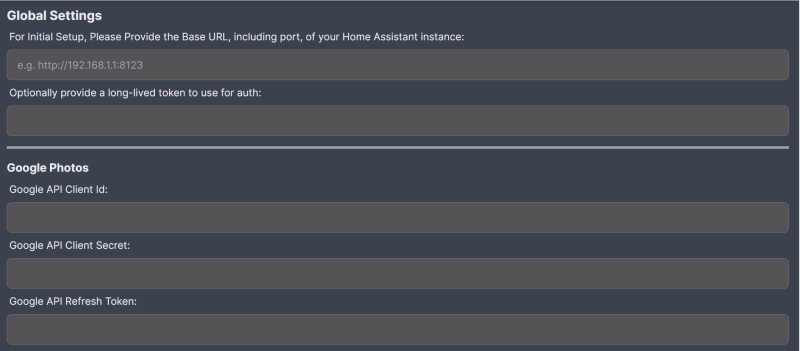
When initially starting Photodash, you'll be greeted by the onboarding screen:

You can get back to the onboarding screen at any time by clicking on Global Settings on the navigation bar.
Here are the different settings:
Global Settings
- Base URL (required): Since Photodash can be installed in several different ways, it doesn't know for sure what the base URL of your Home Assistant instance is. You must specify it here so that it can connect to the Home Assistant API.
- Long-Lived Token (optional): By default, Photodash will require you to log in to your Home Assistant instance. However, you can choose to use a Long-Lived Access Token and paste it here. Photodash will then use that token to make API requests. While it's recommended that you use a standard login, a long-lived token can be useful to prevent the need to log in, especially if you are using Photodash on many devices. Since Photodash is primarily designed to be used inside a user's home, bypassing standard authentication is relatively low-risk.
Google Photos
Photodash supports connecting a Google Photos account to use as a slideshow source. In order to connect to Google Photos, you must fill in a client ID, client secret, and refresh token. Here are the steps to generate those:
Unfortunately, Google does not allow a local IP address to be used as a redirect URL, so Photodash cannot use a more user-friendly authentication method. However, the below steps only need to be completed once. Alternatively, if you are not comfortable with these steps, you can use the local photos integration.
On a computer with a web browser (in other words, not your Home Assistant server), you will need Node.js installed locally and need to clone a specific branch of the Photodash repository. Execute the following command:
git clone https://github.com/apop880/photodash.git -b google-login --single-branchExecute
npm installto install the dependencies for the cloned repository.Go to the Google API Console, and create a new project.
On the project dashboard, click
APIs & Services, thenLibrary. Find and enable the Google Photos Library API.From the menu, navigate to
APIs & Services, thenCredentials. Click onCreate Credentials, thenOAuth Client ID.Be sure to choose "Desktop app" as the application type. Web application might be what you would expect, but it will not work for the reasons listed in the "Why is this a manual process?" box above.
Download the credential file (
client_secret_.----.json), rename it tocredentials.json, and save it in the folder you created in step 1.Go to the
OAuth consent screenand click Publish App. You must complete this step to remove your app from testing mode; otherwise, your token will expire about once a week. Since nobody else has access to the client ID/client secret, publishing the app doesn't really matter from a security standpoint.In a terminal in the folder from step 1, run
node google-login.js.A browser window will open and you'll be asked to authenticate and consent.
The refresh token will be printed in the terminal window. Take that refresh token, along with the client ID and client secret in
credentials.json, and paste those values into the onboarding screen.
You are limited to 10,000 requests to the API per day for metadata, and 75,000 requests per day for photos. Photodash displays a photo every 30 seconds, so a single Photodash instance would display a maximum of 2,880 photos per day, well within the limit. You could theoretically run Photodash connected to Google 24/7 on 26 unique devices without running into quota issues. Note that you can also reduce your quota usage if you are selectively disabling the slideshow based on entity states.
Special thanks goes to GitHub user hermanho for his work on a Google Photos Magic Mirror integration. His work on the token generation piece was heavily borrowed from to build the same functionality for Photodash.
Once you have saved your general settings, you'll be asked to login (if not using a long-lived token) and then directed to the main adminstration menu.